Welcome to Relaxed Farming
- Alpacas
- Chickens
- Dairy Goats
- Ducks
- Geese
- Pigs
- Pygmy Goats
- Quail
- Rabbits
- Sheep
- Turkeys
- Polytunnel
- Photo Stories
- Video Stories
- Food
- Smallholding Map
The Relaxed Farming Polytunnel: The polytunnel build
|
All about the polytunnel
Click to read more
|
The polytunnel build
See below
|
The polytunnel plan
Click to read more
|
The polytunnel year
Click to read more
|
The planting year
Click to read more
|
| Planning | Uprights | Frame | Cultivating | Trench | Doors | Covering 1 | Covering 2 | Fitting | Raised beds | Compost | Finished! |
|
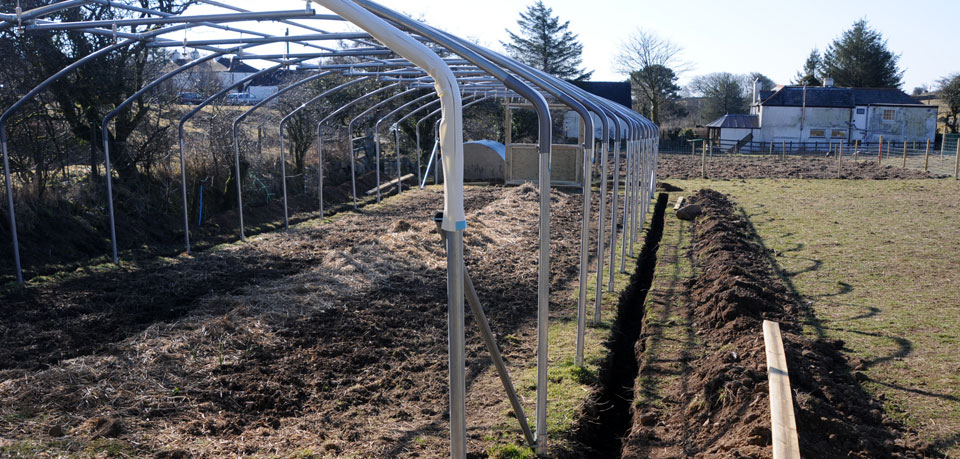
Trench
A very long day's work! Chris from across the lane came to help dig out the trench either side and at each end of the polytunnel. The trench was to be used to bury the sides and ends of the polythene once it was placed over the frame and was about 30cm wide and 30cm deep - we say about as there were some rather awkward rocks which were in completely the wrong place and were very heavy and we had to 'work around' these!! Some rocks had to be moved out of the way - the photo shows the trench being quite wide near this end where some large awkward rocks had to be removed. The 'spoil' or waste material was heaped neatly along the outside of the polytunnel frame ready to be piled back in once we had the polythene cover in place. We also put 'hot spot' tape (white with a blue tag) on the tubing to minimise friction between the polythene and the tubes - friction is where two surfaces rub together, this can cause heat together with potential wearing of the polythene which will make it weaker. The tape will hopefully slow this process down and make the polythene covering of the polytunnel last a few years longer.
 |